There are endless amounts of shapes and curves for us to play with as designers. It’s unavoidable and part of our job to incorporate these shapes and angles. For years, I would find myself working on a project where a guide of a specific shape would help me out. I found myself manually making these with the pen tool, but it was annoying when I couldn’t turn the guide on or off. There had to be an easier way! I did some digging and found the solution, so I’d like to share it with you in this tutorial!
So I’ve got this fun geometric pattern set up as my background and ready to go. I’d like to place the Zipie “Z” throughout this pattern, tilted on its side.

I’d like to place the Zipie “Z” across the diagonal of this grey shape. With my pen tool, I’ll draw a line where I want my guide to go.

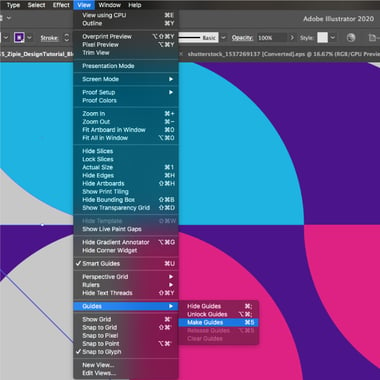
Next, all I have to do is select the line with the selection tool. Then go up to your menu in the top left and select view -> guides -> make guides.


Now I can easily place my tilted logo on this diagonal line!

It’s important to note that this works for any shape! Using the same method, here are some examples I used with the curves in the background graphic. With an existing shape, you’ll want to copy the shape in place (Shift + Command + V), then follow the previous steps! Don’t forget you can turn your guides on and off by using the shortcut Command +; or by going to view -> guides -> hide/show guides.

There you have it! I hope this saves you some time and energy in your design process and helps guide your designs!

